Pregnancy is a special time that can bring about a lot of changes in a woman’s body. A lot of soon-to-be moms choose to document their journey through a maternity shoot. But once they’re on set, they may not feel their best, especially because of all the changes happening in their bodies.
For this article, we’ll dive into how we treated a maternal photoshoot to bring out the subject’s best features through subtle retouching techniques.
Plan of Action
Once we received the photos, we zoomed in to see which parts could be retouched to enhance the model’s features. While the raw shot was pretty good, we noticed that there are some imperfections as we focused on certain areas. So, we made a list of items that we’ll need to retouch to elevate the photo’s quality further.
Below is the list of retouches we wanted to carry out:
- Clear stray hairs
- Heal spots and patches
- Slim down the legs
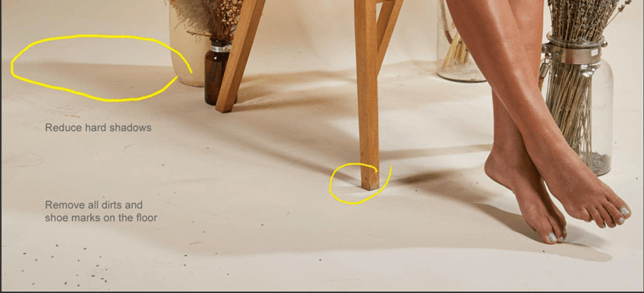
- Reduce hard shadows
- Remove dirt and shoe marks
- Color balance the photo
- Lens correction
Clear Stray Hairs
The first thing we did was to clear the stray hairs. Using an extension app in photoshop, we cleared the fine hair on the model’s face and body to give the photo a cleaner finish.

Heal Spots and Patches
Our next step was to heal the uneven spots and patches on the subject’s skin. We accomplished this using the clone stamp tool. However, you can also use the healing brush to do this task. Simply use whichever instrument you’re more familiar with.
Slim Down the Legs
From afar, you can notice that the model’s legs are a bit thick. To remedy this, we used the liquify tool to make it slimmer.

Reduce Hard Shadows
To reduce the hard shadows, we isolated these areas using a lasso tool and copied it to a new layer. Once we’ve gotten our new layer, we adjusted the brightness and the temperature so that the layer blends better with the surrounding area.
Remove Dirt and Shoe Marks
As soon as we were happy with the photo’s shadows, we moved on to retouching the dirt and shoe marks on the background. We used a spot healing brush tool to draw over the imperfect areas to make it seem like the dirt was never there.

Color Balance the Photo
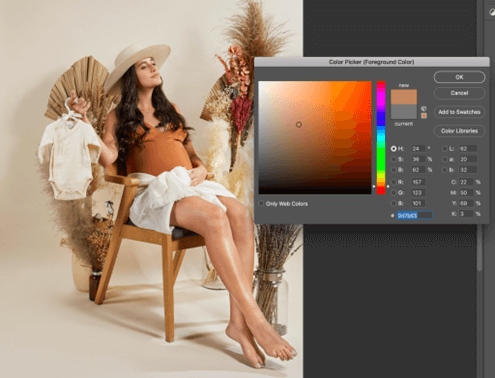
After we’ve removed all the imperfections in the photo, we can now proceed to color balancing the whole image. When we analyzed the photo, we noticed that the color of the model’s legs was too dark. This gives an unbalanced feeling to the whole image.
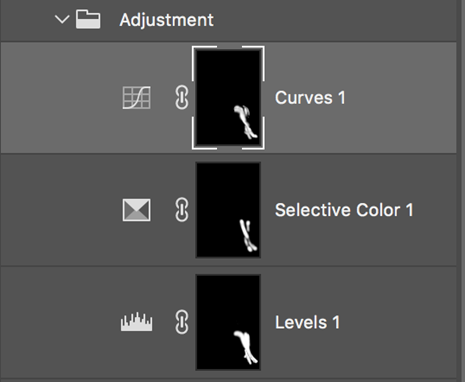
To fix this, we used the color of the subject’s face as a reference and adjusted the colors using the filters in Photoshop. Here’s a step-by-step process of how we executed this:
- Make a mask layer for the leg part so that it will be isolated.
- Adjust the curves to make it lighter
- Adjust the levels for the contrast
- Use selective color to add some saturation
- Used a hue/saturation filter to make the photo warmer

Once we’ve adjusted everything according to our liking, we checked to see if the color adjustment on the legs is close to the color of the face by using the eyedropper tool.

Lens Correction
After we color-balanced the image, there were still some imperfections that can be solved using Photoshop. Upon evaluation, we found that the legs and feet looked big because of the distorted camera lens angle. To solve this, we utilized the lens correction process, which we’ve detailed how to do below:
- Duplicate and merge all layers
- Adjust the layers using the transform tool
- Use a brush tool to fill and blend the overlapping parts behind the first layer

Bring Out the Best in Your Photos
We hope that you’ve learned about how to bring out the best in your maternal photos through our detailed process above.
If you’re still unsure of how to proceed and you’re looking for a professional to help you. You can rely on us at Paper Boat Creative, and we can assist you with your photo retouching needs.
Contact us today to find out more!


