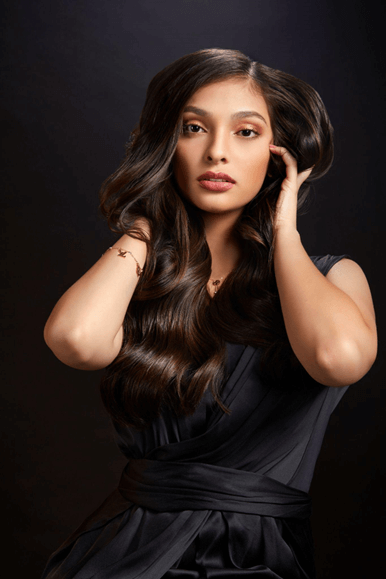
We have two photos of a model posing with her hair above; the one on the left is the raw file and the one on the right is the retouched photo. When it comes to editing, it’s important that you set your goals before getting started on retouching.
For this photoshoot, our focus was to accentuate the hair’s appearance and make it look luxurious. However, it can be hard for a hair stylist to keep the hair tamed the whole time, especially when the model is playing around with the poses. The constant movement makes it inevitable for stray hairs to appear, skin to look imperfect, and clothes to seem baggy.
Issues like that can be solved with a retouching service to make sure that you’re only putting out high-quality photos. In this article, we’ll give you a step-by-step run-through on how to achieve the results above.
Planning Out the Retouching Strategy
Before you start on your retouching process, it’s important that you identify what you need to edit to help you stay on track. For this photo, the four main problems we wanted to fix are:
- The abundance of stray hairs that need to be removed.
- The skin needs to be retouched by smoothening and removing blemishes.
- The clothes are puffed so they must be pushed inward.
- The photo needs to be color corrected to enhance its quality.
1. Removing the Stray Hairs
Stray hairs can ruin the overall glamour of a photo as it can make your picture look poorly executed. It can even distract your audience from looking at your complete image. Thankfully with the right digital intermediary, you can brush away all the stray hairs.
Using Adobe Photoshop’s healing brush tool and spot healing brush tool, you can remove stray hairs from the subject’s photo.

As you can see, removing the stray hairs makes the photo look more polished and keeps your attention on the model. Once you’re happy with the look of your model’s hair, you can now proceed with retouching her skin.
2. Retouching the Skin
It’s common for a high-end camera to capture all the imperfections of your model’s skin. Even if the makeup artist has done their best to enhance the subject’s beauty, factors like heat and movement can ruin the flawlessness they tried to achieve.
By using the clone stamp tool in Photoshop, you can smoothen your model’s face and help her put her best skin forward when you publish your photo.

Once your edits are finished, you should see the difference that the cloning stamp tool makes. The cloning tool has removed the fine lines on the model’s face, and it has enhanced the photo’s overall quality.
Before you move on to warping the clothes, don’t forget to make a quick pass with the cloning stamp tool on the exposed skin of the model to eliminate blemishes there as well.
3. Adjusting the Clothes
While your model may be constantly moving to get you the angle and pose that you want, the clothes are also moving with them. So, while your stylist has picked, ironed, and dressed your model to fit your desired aesthetic, the garments can still look puffed and ruffled. This can prove to be a challenge especially if you’re aiming to put out elegant photos.
This is where the warp tool comes in. By using the warp tool to subtly adjust the model’s clothing, you can ensure that the garments look flattering on your subject.

In the photo above, you’ll see that the warp tool was used on the fabric for it to hug the model’s curves and enhance the overall look of the picture.
Once you’re happy with all your retouches, you can now move on to adjusting the colors of the image for the perfect studio finish.
4. Color Correcting the Image
Now, we’re onto the last part of photo retouching, which is adjusting the layers and the curves of the photos. While studio lighting and diffusers can allow you to have excellently lit photos, they may not always have the depth of the color you’d like to tell the story you want to tell.
Through color grading, you can create a cohesive look for your photos and neutralize the color differences that the human eye will see. You can do this by adjusting the curves and leveling the layers of your image.

The final image after adjusting the colors should look like this:

The model’s features have been enhanced, and the photo has more depth. Now, your photo is ready for publication or printing!
Achieving Studio Finish Results With Paper Boat Creative
Taking good photos aren’t enough to ensure high-quality images. You’ll need to use retouching techniques to keep your pictures looking flawless and perfect. As we’ve shown you above, you can retouch photos for maximum visual impact. And no matter how subtle, these retouches can transform a photo from good to great!
We all know how important it is that you present only the best-looking photos to get your audience interested, so if you’re still struggling to edit your photos, you can count on us at Paper Boat Creative for your picture retouching needs.
Reach out to us today and see how we can help you elevate your work.


