
For photographers, jewelry store owners, and visual artists, using shadows in jewelry photos and images can create a variety of different results. It can add depth, set a mood, or simply make the jewelry piece look more three-dimensional.
However, before you start fiddling with shadows in your photos, it’s important to understand how they work and what effect you’re going for.
With that in mind, we provide you with a few tips on how to use shadows in jewelry photography and photo editing, or you can also look for jewelry photo editing services to make your life easier.
So without further ado, let’s get on with the blog.
Things to Keep in Mind
Before we talk about how to create shadows in your jewelry images, here are two things to remember whenever you edit jewelry images:
- Make your shadows look realistic
- Be consistent
Make Your Shadows Look Realistic
While creativity is valued, ensure that your photos do not appear too edited and that the shadows you incorporate look natural. One way to make shadows look more realistic is by using the same light source for both the subject and the background. This will help the shadows match up and not look out of place.
Be Consistent
As with anything you edit, be consistent with your shadows. If you use a lot of shadows in some photos but not others, it will look like you made a mistake in your editing. If you want to use shadows sparingly, be mindful of where you place them so that the results are cohesive.
Using shadows in jewelry photography and photo editing can create a variety of different results, but it’s important to understand how realism and consistency can only be effective when you’re doing it right.
The Types of Shadows in Jewelry Photos
Different types of shadows create unique looks for your jewelry photos. Each one can give off a distinct vibe, so choose which shadow type you think best fits the aesthetic you want.
Also, do note that there are various ways to use shadows in your photos and images of jewelry. Depending on your familiarity and expertise using post-processing tools, you can come up with really creative ways to implement chiaroscuro-like effects. That said, feel free to check our blog on the best photo editing software for jewelry.
Here are three types of shadows that can make your jewelry shine in your photos:
- Drop Shadow
- Natural Shadow
- Reflection Shadow
Drop Shadow
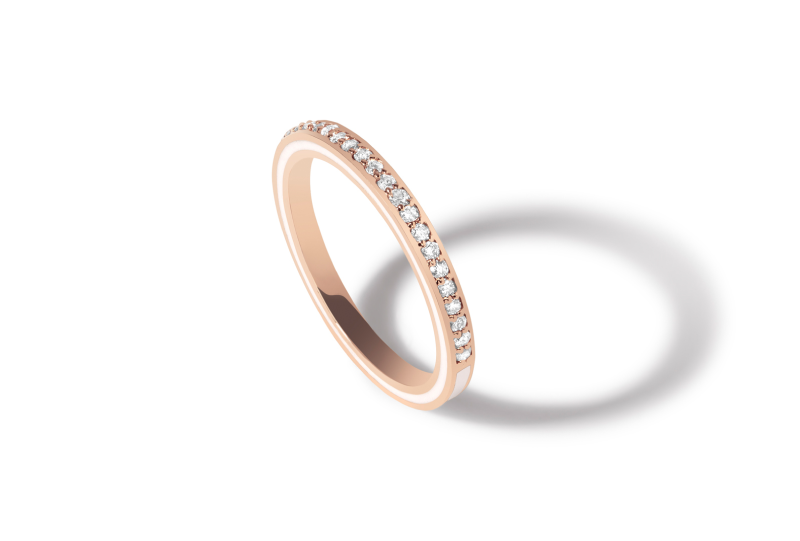
A drop shadow is a type of shadow that’s created when an object is raised above the surface it’s resting on. The result is a darker area beneath the raised object. Adjusting your jewelry images using drop shadow gives the featured piece more dimension by making it seem elevated from the background surface.
Try these techniques to create drop shadows for your jewelry photos:
Method 1
- Open your image in Photoshop. Make sure your photo has a high resolution.
- Create a layer. To do this, look for the ‘Layer’ panel on the right side of your screen and right-click the current layer to create a new one. Label your layers to make editing easier.
- Duplicate the jewelry layer and select the product. Add 50% grey to this selection.
- Blur the current layer to however you want the shadow to look. Experiment with the harshness and softness of the shadow.
- Make a mask on the shadow layer. Brush out the tops of the jewelry and ensure that only some parts of the shadow “touch” the ground. This helps make your jewelry look more realistic.
- Check that you’re satisfied with the outcome, then export the photo.
Method 2
- Open a high-resolution photo of the product you want to feature and create a layer. (Not sure how to create a layer? Follow Step 2 in “Method 1” and don’t forget to organize and label your layers!)
- Make a path using the pen tool. Select the pen from the toolbar and use it to draw around the jewelry you want to outline. Double-click once you’re done with the path, then remove the background.
- Duplicate the layer without a background and label it differently from the previous layer.
- Select the shadow layer or the first layer without a background. Click on the transformation tool and position this background to match the light source of your jewelry. Adjust this layer however you see fit.
- Tick the button next to ‘Lock’ for all layers. This ensures that the subsequent edits made on layers do not affect other layers.
- Create a gradient by selecting the ‘Gradient’ tool and then choosing the ‘Linear’ option. Click the shadow nearest your subject and drag it outwards. This should give you a shadow that looks unnatural.
- Click the same button from Step 5 to unlock the layers.
- Look for ‘Multiply’ on the drop-down menu beside ‘Opacity’ on the right side of your screen.
- Select the ‘Filter’ on the main menu on top of your screen. Choose ‘Blur’ then ‘Gaussian Blur.’ Experiment with the shadow by adjusting the pixel radius.
- Enable the ‘Free Transform’ tool to transform the shadow however you want. This is a trial-and-error process, but one thing to keep in mind is to move the shadow based on the light source.
- Apply final touches like adjusting the flow and opacity. Once you’re happy with the result, save the image.
Natural Shadow

Basically, natural shadows are created by the light source in your environment. These exist without you having to do anything and can provide a more subtle way to add dimensionality to your jewelry photos. The easiest way to create natural shadows is by taking advantage of the existing light in your environment.
Natural shadows in your jewelry photos add composition and give off the impression of space.
Here is one way to achieve a natural shadow:
- Open a high-resolution image of your jewelry in Photoshop, then add a new layer and fill it with white background.
- Select a small area at the bottom of the jewelry; this is where the shadow will be its darkest.
- Refine the edges of your selection to create soft curves, and adjust the darkness of the area nearest the jewelry.
- Choose a ‘Rounded Rectangle’ or an ‘Ellipse’ tool a little to the right of your screen near the jewelry. Polish and soften then match with the small shadow you’ve created.
- Adjust and refine the gradient to smoothen the transition from dark to black. Modify the opacity to make it more natural.
- Go over your work and once you’re satisfied, export the photo.
If you’re having difficulty understanding how to use shadows in your jewelry images, try using natural shadows and follow these steps above or get it done via professional photo manipulation services.
Reflection Shadow

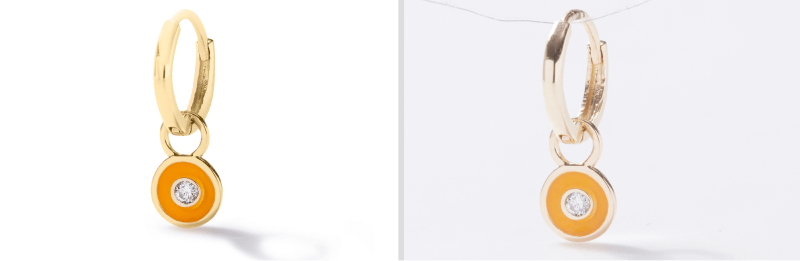
And lastly, using a reflection shadow is an easy way to make your jewelry photos more interesting. Reflection shadows are created when light bounces off a surface and casts a shadow. This is most commonly seen in glossy or metallic surfaces.
Metal components such as rings often have a smooth surface, which makes it difficult to produce a natural shadow. In this case, you can create a reflection by duplicating the layer that contains your jewelry.
Here are two ways to create reflective shadows using Photoshop:
Method 1
- Open your jewelry photo in Photoshop, add a new layer, and then fill it to be a white background.
- Label the layers then duplicate the layer with the jewelry. Rotate and adjust the layer to make it a mirror image of the original photo.
- Add a faded gradient mask to the vertically rotated layer, or reflection layer, to make it look faded. Blur the image to your liking and make it look softer, more like a reflection than a copy.
- Put a slight shadow at the bottom of the product to make it more realistic. Look over the final product and export it when you’re done.
Method 2
- Open the photo you want to edit with Photoshop.
- Draw a rectangle around the part of the image you plan to use as a reflection using the ‘Marquee’ tool. It is located on the left side of your screen, just below the ‘Move’ tool.
- Right-click the image and select ‘Layer Via Copy’ or click on ‘Edit’ and select ‘Copy.’ Both ways help you create a new layer with the area you selected.
- If you used the latter option in Step 3, paste the new layer by clicking on ‘Edit’ and then ‘Paste.’ This puts the reflection right on top of the original image.
- Select ‘Transform’ from the ‘Edit’ menu and flip the reflection vertically.
- Use the ‘Move’ tool to drag and position the flipped image.
- On the ‘Layers’ panel at the middle right of your screen, change the blend mode from ‘Normal’ to ‘Lighten’ or ‘Screen.’
- Tone down the reflection with a mask and the ‘Gradient’ tool. Click on the ‘Add vector mask’ at the bottom right of your screen, then select ‘Gradient’ from the tools panel on the left of your screen.
- Switch your foreground and background colors by clicking on the color swatches at the lower left of your screen. Ensure that black is the foreground color while white is the background.
- Experiment with the gradient and how the reflection looks. Check that the foreground or background change is on the mask, not the layer.
- Inspect the photo and save it when you’re satisfied with the outcome.
Should Jewelry Photos Have Shadows?
While some photographers, graphic designers, or photo editors might say that jewelry photos are better off without any shadows, we think otherwise. For many other visual creatives, the answer to this question is: It depends.
Photographs and professional photo enhancement are essential in marketing jewelry. After all, with images of luxury and elegance, it’s necessary to keep the entire photograph looking cleanly done.
Ultimately, using shadows is a creative strategy to convey your brand identity and highlight your jewelry collection, but there can be instances wherein using shadows won’t work. As a professional, one would know when and when not to use shadows in jewelry photos.
Conclusively, you can craft sharper and better product shots using jewelry retouching techniques, like emphasizing light and shadow, to enhance the quality of the images you publish. But you can also have your collection stand out from the competition with Paper Boat Creative!
Sail with us to make your jewelry collections showcase elegance and splendor – one that casts a shadow uniquely yours.
Contact us today or visit our website for more details.